How to Setup a Kubernetes Cluster on Microsoft Azure
In this post, we are using Ubuntu 14.04 LTS VMs as official installations of Kubernetes are tested on the same version of Ubuntu.
Prerequisites:
User must be ready be with the following RSA keys:

3. Now create a Vnet and Subnet in same the Resource group.
Make sure to select at least /16 address space.

4. The next step is to create Network Security group in the same Resource group.

Attach inbound and outbound security rules to newly created Network Security group.
To make the installation process easily understandable we have allowed traffic on all the ports.
But the recommended way is to only open certain ports which are used by Kubernetes(22, 8080).
Also to make the services publicly accessible (which are running on kubernetes on certain ports), user is required to allow these ports as well in security rules(inbound/outbound).


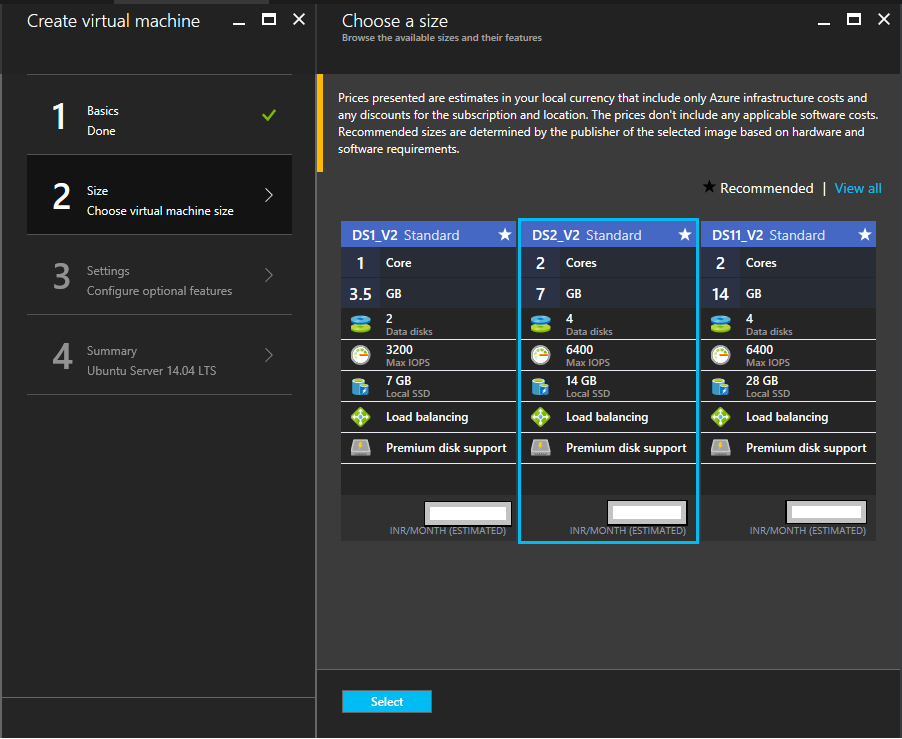
5. Now we can go ahead and provision Kubernetes Master (Ubuntu 14.04LTS VM).
a. Choose Ubuntu Server 14.04 LTS from Azure marcketplace.

b. Choose Authentication Type as SSH public key and paste the public key value in text box.

c. For master 2core/7GB vm works fine, while a node can work with a little lesser size like 1core/3.5GB.

d. In Settings, select existing VNet and Network Security group.

e. After checking the summary click on 'OK' to launch the VM.

6. The same way Node 1 and Node 2 can be provisioned. Nodes can have less T-shirt size for cost management.

7. Now we have all the three VMs(master, node1, node2) up and running.

8. The next step is to login to all the three machine using Private key and Installing Docker 1.2+ and bridge-utils.
Commands to Run for install Docker and Bridge-Utils
sudo apt-get update
sudo apt-get install -y apt-transport-https ca-certificates bridge-utils
sudo apt-key adv --keyserver hkp://ha.pool.sks-keyservers.net:80 --recv-keys 58118E89F3A912897C070ADBF76221572C52609D
echo "deb https://apt.dockerproject.org/repo ubuntu-trusty main" | sudo tee /etc/apt/sources.list.d/docker.list
sudo apt-get update
sudo apt-get install -y linux-image-extra-$(uname -r) linux-image-extra-virtual
sudo apt-get install -y docker-engine
sudo service docker start
sudo groupadd docker
sudo usermod -aG docker $USER
9. Now the rest of the work is to be done only on master, so login to the master and do the following steps.
a. create Installation Directory and Clone the latest Kubernetes binaries from Github.
mkdir /opt/kube-install
cd /opt/kube-install
git clone --depth 1 https://github.com/kubernetes/kubernetes.git
b. Find the private IPs of all three machines from Azure VNet.

c. Configure the cluster information in /opt/kube-install/kubernetes/cluster/ubuntu/config-default.sh.
Sample cluster information :
(here kube-user and kube-node are user name to login with respective VMs private ips)
export nodes=${nodes:-"kube-user@10.0.0.4 kube-node@10.0.0.5 kube-node@10.0.0.6"}
roles=${roles:-"ai i i"}
export roles_array=($roles)
export NUM_NODES=${NUM_NODES:-3}
export SERVICE_CLUSTER_IP_RANGE=${SERVICE_CLUSTER_IP_RANGE:-10.0.1.0/24}
export FLANNEL_NET=${FLANNEL_NET:-10.1.0.0/16}
DNS_SERVER_IP=${DNS_SERVER_IP:-"10.0.1.10"}
d. After all the above variables being set correctly, we can use following command in
/opt/kube-install/kubernetes/cluster/ directory to bring up the whole cluster.
Note: Before running the below commands copy OpenSSH key to master using WinSCP to
/opt/kube-install/ directory.
Commands to run:
cd /opt/kube-install/kubernetes/cluster/
sudo chmod 600 /opt/kube-install/<ssh_key_name>
eval "$(ssh-agent)"
ssh-add /opt/kube-install/<ssh_key_name>
KUBERNETES_PROVIDER=ubuntu ./kube-up.sh
If the last command ran successful then user can see green output on the screen.

10. Now Kubernetes Cluster is up and running and Additional configurations can be done.
a. Add kubectl binaries to PATH.
i. Run the 'vi /etc/environment' command and add '/opt/kube-install/kubernetes/cluster/ubuntu/binaries' to PATH including a colon.
ii. source env using 'source /etc/environment' command.
b. Node status can be checked using 'kubectl get nodes' command.
c. To enable UI and DNS run the following commands:
cd /opt/kube-install/kubernetes/cluster/ubuntu
KUBERNETES_PROVIDER=ubuntu ./deployAddons.sh
After successful run of above command UI can seen at http://<kubernetes-master-ip:8080>/ui
If the above process doesnot make UI up then alternatively we can use below command:
kubectl create -f https://rawgit.com/kubernetes/dashboard/master/src/deploy/kubernetes-dashboard.yaml
d. You may find following commands useful, the former one to bring down the cluster, while the latter one could start it again.
cd /opt/kube-install/kubernetes/cluster/
KUBERNETES_PROVIDER=ubuntu ./kube-down.sh
KUBERNETES_PROVIDER=ubuntu ./kube-up.sh
Prerequisites:
User must be ready be with the following RSA keys:
- Public Key
- Private key
- OpenSSH Key
Okie!! So lets start now.
1. Login into you Microsoft Azure Account.
2. Create an empty Resource group.
3. Now create a Vnet and Subnet in same the Resource group.
Make sure to select at least /16 address space.
4. The next step is to create Network Security group in the same Resource group.
Attach inbound and outbound security rules to newly created Network Security group.
To make the installation process easily understandable we have allowed traffic on all the ports.
But the recommended way is to only open certain ports which are used by Kubernetes(22, 8080).
Also to make the services publicly accessible (which are running on kubernetes on certain ports), user is required to allow these ports as well in security rules(inbound/outbound).


5. Now we can go ahead and provision Kubernetes Master (Ubuntu 14.04LTS VM).
a. Choose Ubuntu Server 14.04 LTS from Azure marcketplace.

b. Choose Authentication Type as SSH public key and paste the public key value in text box.

c. For master 2core/7GB vm works fine, while a node can work with a little lesser size like 1core/3.5GB.
d. In Settings, select existing VNet and Network Security group.

e. After checking the summary click on 'OK' to launch the VM.

6. The same way Node 1 and Node 2 can be provisioned. Nodes can have less T-shirt size for cost management.

7. Now we have all the three VMs(master, node1, node2) up and running.
8. The next step is to login to all the three machine using Private key and Installing Docker 1.2+ and bridge-utils.
Commands to Run for install Docker and Bridge-Utils
sudo apt-get update
sudo apt-get install -y apt-transport-https ca-certificates bridge-utils
sudo apt-key adv --keyserver hkp://ha.pool.sks-keyservers.net:80 --recv-keys 58118E89F3A912897C070ADBF76221572C52609D
echo "deb https://apt.dockerproject.org/repo ubuntu-trusty main" | sudo tee /etc/apt/sources.list.d/docker.list
sudo apt-get update
sudo apt-get install -y linux-image-extra-$(uname -r) linux-image-extra-virtual
sudo apt-get install -y docker-engine
sudo service docker start
sudo groupadd docker
sudo usermod -aG docker $USER
9. Now the rest of the work is to be done only on master, so login to the master and do the following steps.
a. create Installation Directory and Clone the latest Kubernetes binaries from Github.
mkdir /opt/kube-install
cd /opt/kube-install
git clone --depth 1 https://github.com/kubernetes/kubernetes.git
b. Find the private IPs of all three machines from Azure VNet.

c. Configure the cluster information in /opt/kube-install/kubernetes/cluster/ubuntu/config-default.sh.
Sample cluster information :
(here kube-user and kube-node are user name to login with respective VMs private ips)
export nodes=${nodes:-"kube-user@10.0.0.4 kube-node@10.0.0.5 kube-node@10.0.0.6"}
roles=${roles:-"ai i i"}
export roles_array=($roles)
export NUM_NODES=${NUM_NODES:-3}
export SERVICE_CLUSTER_IP_RANGE=${SERVICE_CLUSTER_IP_RANGE:-10.0.1.0/24}
export FLANNEL_NET=${FLANNEL_NET:-10.1.0.0/16}
DNS_SERVER_IP=${DNS_SERVER_IP:-"10.0.1.10"}
d. After all the above variables being set correctly, we can use following command in
/opt/kube-install/kubernetes/cluster/ directory to bring up the whole cluster.
Note: Before running the below commands copy OpenSSH key to master using WinSCP to
/opt/kube-install/ directory.
Commands to run:
cd /opt/kube-install/kubernetes/cluster/
sudo chmod 600 /opt/kube-install/<ssh_key_name>
eval "$(ssh-agent)"
ssh-add /opt/kube-install/<ssh_key_name>
KUBERNETES_PROVIDER=ubuntu ./kube-up.sh
If the last command ran successful then user can see green output on the screen.

10. Now Kubernetes Cluster is up and running and Additional configurations can be done.
a. Add kubectl binaries to PATH.
i. Run the 'vi /etc/environment' command and add '/opt/kube-install/kubernetes/cluster/ubuntu/binaries' to PATH including a colon.
ii. source env using 'source /etc/environment' command.
b. Node status can be checked using 'kubectl get nodes' command.
c. To enable UI and DNS run the following commands:
cd /opt/kube-install/kubernetes/cluster/ubuntu
KUBERNETES_PROVIDER=ubuntu ./deployAddons.sh
After successful run of above command UI can seen at http://<kubernetes-master-ip:8080>/ui
If the above process doesnot make UI up then alternatively we can use below command:
kubectl create -f https://rawgit.com/kubernetes/dashboard/master/src/deploy/kubernetes-dashboard.yaml
d. You may find following commands useful, the former one to bring down the cluster, while the latter one could start it again.
cd /opt/kube-install/kubernetes/cluster/
KUBERNETES_PROVIDER=ubuntu ./kube-down.sh
KUBERNETES_PROVIDER=ubuntu ./kube-up.sh

